Email Help Procedure

Webmail/SquirrelMail

To use the webmail program called ‘SquirrelMail’ you can login at the following address:http://mail.vcn.bc.ca

SquirrelMail offers an interface to your mail inbox that has lots of features and options, including:

  1. a folder system
  2. a filter system
  3. spellchecking with several international dictionaries
  4. several colour schemes
  5. and the ability to translate your messages using one of several translation servers on the Internet

E-mail any problems, comments, or suggestions you have with SquirrelMail to [email protected].

How to check folder size

Follow below steps to check your folder sizes.

  1. Sign in into your account through http://www.vcn.bc.ca.
  2. After you logged in into your account, click on “Folder Sizes” on the left column as shown below:
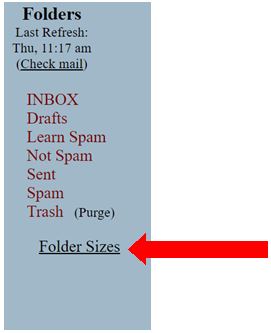
  3. In the new window, you can see the sizes of each folder depending on the number of emails and their attachments you have moves/saved in those folders.

** Always try to keep your folder’s sizes small and below 100MB. If your account is large, you may not receive emails and communications.

Email Help Procedure

Android

  1. Under You can configure Email…, type your Email Address and Password
  2. For What type of account is this?, choose POP3.
  3. Under POP3 server, it should be mail.vcn.bc.ca
  4. Press Next
  5. For the SMTP server, it should be mail.vcn.bc.ca as well.
  6. Please uncheck the box where it states “Required Sign-in”.
  7. Press Next
  8. For Inbox checking frequency, you can leave it to Every 15 minutes
  9. Press Next
  10. For Give this account a name, type for example, Luis’ VCN
  11. For your name to be on outgoing messages, for example, type Luis Panagua
  12. Now, you have email on your Android Phone.

Email Help Procedure

iPhone

  1. Go to Settings.
  2. Then, go to MailContactsCalendars.
  3. Choose Add Account.
  4. In the screen with different email options, choose Other.
  5. Now, press Add Mail Account.
  6. And, then fill your information: NameEmail, and Password.
  7. The next step, under Incoming Mail Server, is to fill in the Host Namemail.vcn.bc.ca,User Name, and Password.
  8. Under Outgoing Mail Server please follow the instructions provided by your Internet provider.
  9. Press Next and you will be done.

Email Help Procedure

Automatic Forwarding

Automatic Forwards using PINE or Telnet

  • Log into Telnet using telnet://vcn.bc.ca/
  • Go to “[5]E-mail – Send and receive electronic mail – Email options”
  • Go to “* [8]Change your email forwarding options”
  • Go to “[1]Forward Your E-mail Elsewhere”
  • Beside “Where would you like to forward to:” enter the email address you want to forward to.
  • Press ENTER.
  • Press ENTER again.

Email Help Procedure

Telnet

Users could also use our Telnet access to check and send emails

Or to open Telnet manually

  1. Open the Start Menu and click Run
  2. Type telnet and press ENTER
  3. In the window that opens type open vcn.bc.ca and press ENTER
  4. Login with your VCN username and password


Email Help Procedure

Apple Mail

  1. Open Mail (click it on the Dock or open it from the Applications folder).
  2. If the “Welcome to Mail” assistant does not appear, choose Add Account from the File menu.
  3. Fill in the Full NameEmail address, and Password fields.
  4. Note: Your email account password will be stored in Keychain to allow you to automatically log in to your email account when you open Mail.
  5. Deselect “Automatically set up account” if it is enabled. Click Continue to proceed.
  6. Choose the proper Account Type, which is POP.
  7. Give your account a useful description, such as “Anne’s VCN Account”. It can be called whatever you want.
  8. Enter your Incoming Mail Server, which is mail.vcn.bc.caUser Name and Password. Click Continue to proceed.
  9. For Outgoing Mail Server, enter a useful description such as “VCN’s Outgoing Mail Server”.
  10. Enter the Outgoing Mail Server details, which is mail.vcn.bc.ca
  11. Make sure also that Use only this server is checked.
  12. If necessary, uncheck “Use Authentication”. Click Continue to proceed.
  13. Verify your settings in the Account Summary. Check “Take account online”. Click“Create” to complete the process.

Email Help Procedure

Windows Live Mail

  1. Open Windows Live Mail
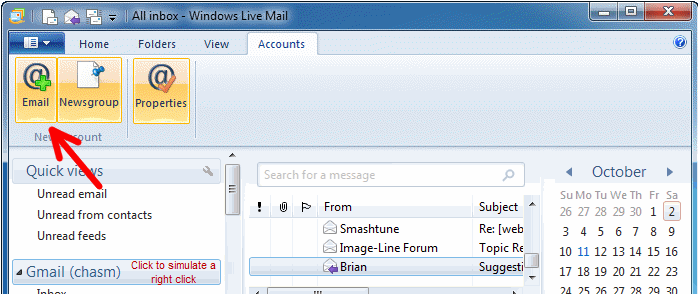
  2. A Pop-Up should automatically appear to add an e-mail account.
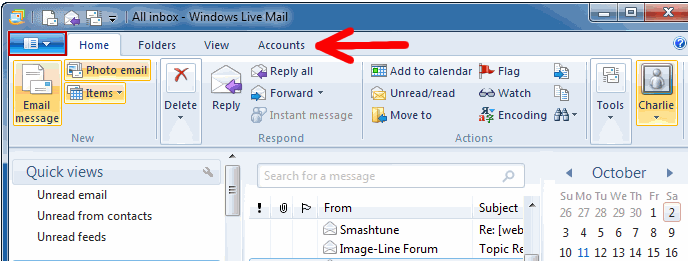
    NOTE: If it does not appear automatically: go to Accounts tab and click on Email button on the left panel.
    wlm_2011_1

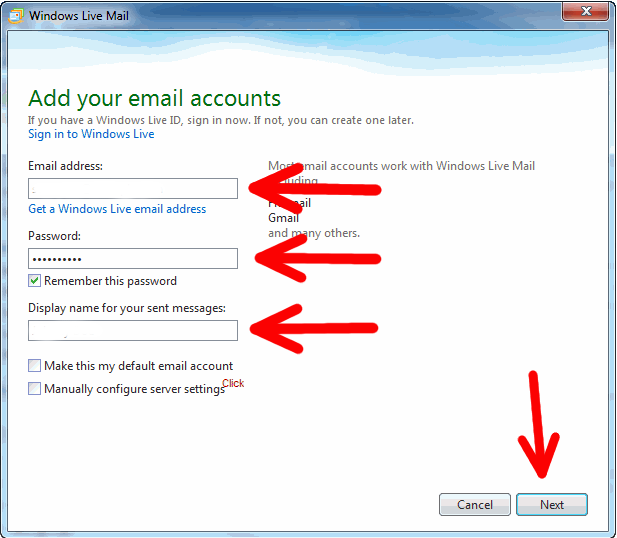
    wlm_2011_2

  3. Enter the address to be shown in your e-mail eg. [email protected] in the E-mail address field.
  4. Enter your VCN password in the Password field. If you would like Windows Live Mail to remember your password make sure the Remember password check box is checked.
  5. Enter your Display Name. This is the name that will appear to people when you send e-mails.
  6. Click Next.
    wlm_2011_3
  7. Under Incoming Server Information enter mail.vcn.bc.ca in the incoming server field.
  8. Under Outgoing Server Information enter out.vcn.bc.ca in the outgoing server field. (Using the Outgoing Mail Server ‘out.vcn.bc.ca’ first requires registering for access HERE)
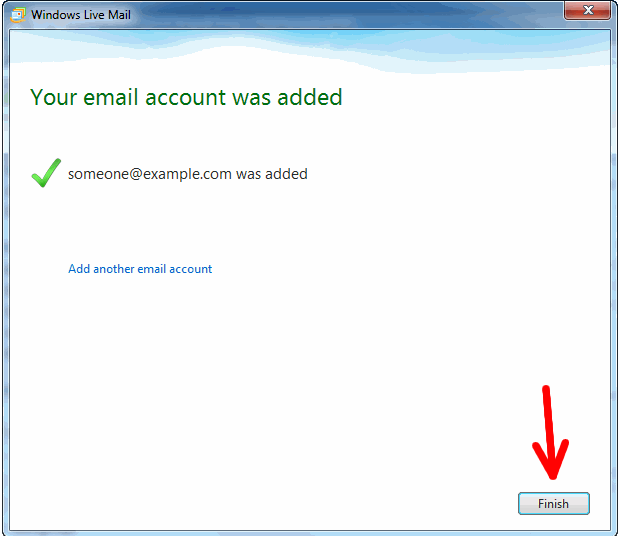
  9. Click Next. Then click Finish.
    wlm_2011_4

Email Help Procedure

Outlook Express

There are minor differences in the layout between the two applications, however the information and which step you put the information in should be very similar.

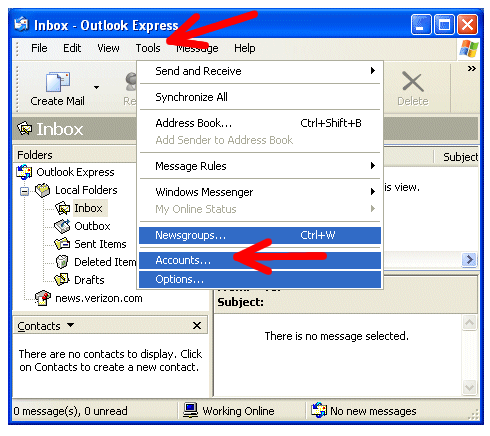
    1. Start Outlook Express, and on the Tools menu, click Accounts.ol_express_1
      NOTE: If the Internet Connection Wizard starts up automatically, skip ahead to step 3.
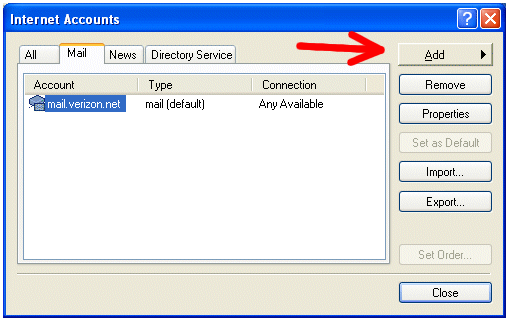
    2. Click Add, and then click Mail to open the Internet Accounts Wizard:ol_express_2
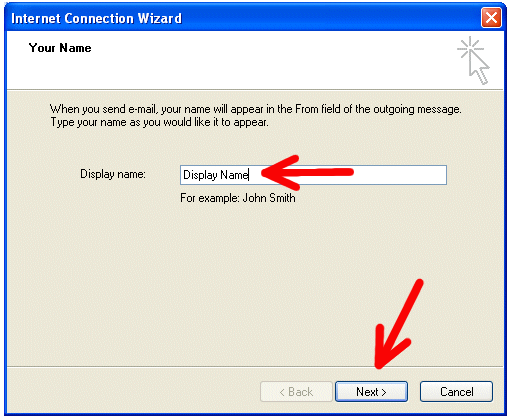
    3. On the Your Name page of the wizard, type your name as you want it to appear to everyone who gets e-mail from you, and then click Next.Most people use their full name, but you can use any name-even a nickname-that people will recognize:
      ol_express_3
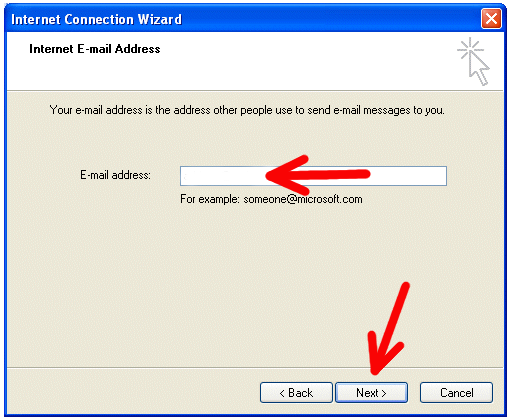
    4. On the Internet E-mail Address page, type your e-mail address, and then click Next:ol_express_4
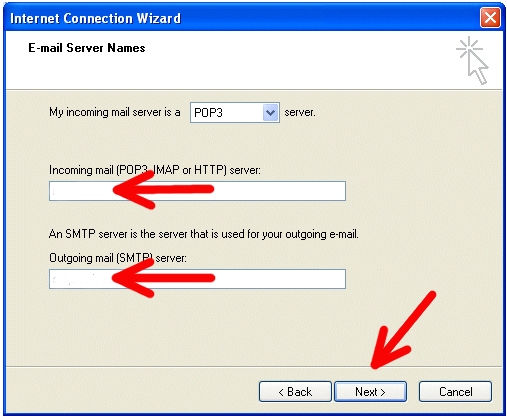
    5. On the E-mail Server Names page, you will be using a POP3 account:
      • The Incoming mail server will be: mail.vcn.bc.ca
      • The Outgoing SMTP server will be: out.vcn.bc.ca
      • NOTE: If you wish to use Telus or Shaw as your internet provider, please go to your provider’s website and follow their Outgoing Server settings.
      • NOTE: Using the Outgoing Mail Server ‘out.vcn.bc.ca’ first requires registering for access HERE.

      ol_express_5

    6. On the Internet Mail Logon page, type your account name and password.
    7. Click Next, and then click Finish.

ol_express_7

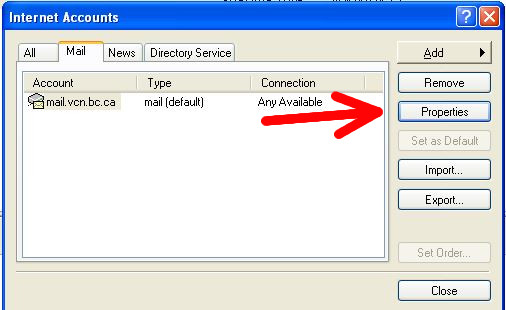
8. Now we need to reconfigure Incoming/Outgoing server settings. From the Tools menu, click Accounts and press on Properties button:
Capture_1

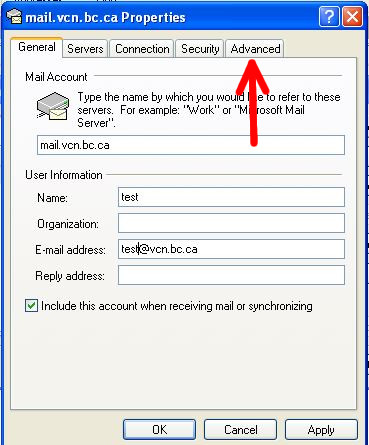
9. Go to Advanced tab:
Capture_2Capture_1

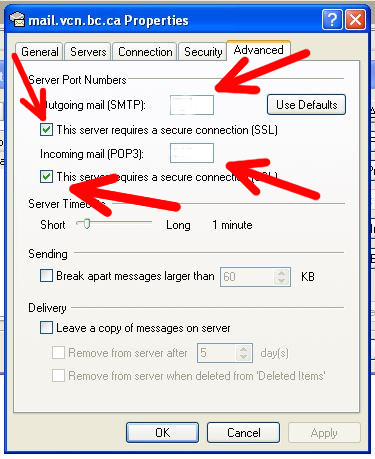
10. Change Incoming/Outgoing server settings as following:

    • Incoming settings:
      Incoming mail: 110
      Check “The server requires a secure connection (SSL)” check-box
    • Outgoing settings:
      Outgoing mail (SMTP): 587
      Check “The server requires a secure connection (SSL)” check-box

Capture_3

11. Press on OK button.

Email Troubleshooting

Cannot Receive Emails

PROBLEM DESCRIPTION

Unable to receive new emails in VCN email account

CAUSE OF ISSUE

There is a 100 MB mailbox limit enforced. If users report that they are not able to receive emails, it is most likely that their inbox has reached 100 MB.

SOLUTION
  • Check the reports released regarding mailbox that reached the 100MB limit to see if their username is on the list.
  • Check with the customer if they recently received any email warning about the size of their mailbox.
  • If their mailbox has indeed reached the limit, ask them to delete emails to reduce the inbox size so that they can start receiving
  • Escalate this issue to a senior staff, if you are unable to resolve the issue after making sure that mailbox is below the 100 MB limit

Email Troubleshooting

Cannot Send Email

PROBLEM DESCRIPTION

Cannot send email on Windows or Mac computer

CAUSE OF ISSUE

There can be a variety of issues why email cannot be sent such as:

  • Connection Problems
  • Program or Folder Corruption
  • Server Setting  Issues
  • User’s VCN account is validated as TEXT and not PPP.(Usually reported by customers who have new VCN accounts)
SOLUTION

Check computer and cables for proper internet connection. For more information, please refer to Resolving Connectivity Issues or Resolving Common Dial-Up Issues.

There can be other conflicting programs like antivirus software or something in the email program itself that may be causing the issues such as corrupted folders. Try to temporarily deactivate conflicting program(s) or clear pending message(s) in the Outbox Folder to correct some basic issues

Check the server settings as indicated below for the supported email clients such as OutlookOutlook ExpressThunderbird, and Apple Mail:

Email Client Server Settings:

Incoming (POP): vcn.bc.ca
Outgoing Server (SMTP): mail.vcn.bc.ca

For users connected to the internet using another ISP, ask the user to check with their Internet provider on the correct pop3/smtp server settings of their Outgoing Mail Server.(example: Shaw: mail.shaw.ca, Telus: smtp.telus.net)

Incoming Server: mail.vcn.bc.ca or outgoing mail server of ISP Provide(the same as Outgoing Server)
Incoming / Outgoing User Name: anything before the @ symbol in user’s email address such as someone for the email address someone@vcn.bc.ca
Incoming Mail Port#: 110
Outgoing Mail Port#: 25

If issue is caused by VCN account validated as TEXT:

  • Log into PUTTY and check the user’s account.
  • Enable PPP access for the account.
  • If this does not resolve the issue, escalate to a senior staff.